
Deburring
When it comes to building the tail I have just one word for you die grinder... Ok, maybe two. When hooked up to a small scotch brite wheel, this will save you many hours of hand sanding and deburring. Oh, and leave that blue plastic on as long as possible, only take it off when your ready to scuff before priming. Please also notice the mask. This part of the assembly process generates a great deal of aluminum dust. Save your lungs and get a cheap dust mask from your local hardware store. It's worth it. It dramatically cuts down on the production of "black boogers".
Number 320 "metal" grade sand paper and red scotch brite pads
come in handy here as well. Keep your files in the tool
box. You don't want to take off any more aluminum than you
absolutely have to at this point.
When Van's tells you to deburr the doublers, that's exactly what he means. Remove every single scratch big enough for your fingernail to stop in. If it's that deep then a stress riser could form, and then a crack, and then.... well, the horizontal stabilizer is IMPORTANT to your safety. Remember the ground is hard and the laws of physics are unforgiving.

Blue Film Removal
Soldering Iron. Make sure you sand off the tip to remove
any burrs before scraping it across your fresh new aluminum skin.
If done right this will leave virtually no marks. Any light
scratches can be polished out later if your into a polished plane.
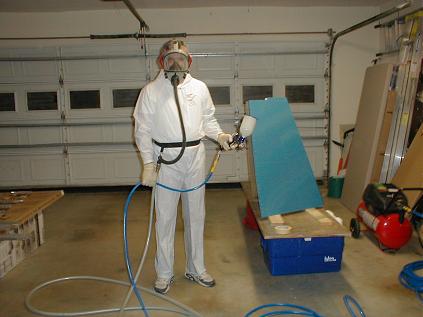
Priming
Since this is plane number 2 for me I have run the gambit for
trying everything known to man regarding priming. I read the
archives,
talked to fellow builders, tried several methods of application, and
tested
the results. There are many fine solutions to priming and what I
used is just one.
Sherwin William's P60-G2 Wash Primer.
This is a catalyzed primer ( 2 part ) that goes on hard as
nails
and is super light. It's the same stuff that Van's uses on their
quick
build kits. It's easy to shoot, paint on with a brush, or even
brush
on with a rag. It's so thin that you can do an entire plane with
one
gallon. Dries to the touch in just 15 minutes. If you do it
right
all you get on the surface of the metal is just a light green hue.
It
takes interior finish paint really well. I'm using this for all
inside
priming including the instrument panel.
The process I use to prep for priming is :
1. Scotch brite everything with the red scotch brite pads. (
just scratch the surface to give it tooth for the primer to adhere to )
2. Wash everything off with water and a light kitchen cleanser like Bon
Ami. ( gets rid of the fish oil on the aluminum )
3. With gloves and a respirator on wipe everything off with lacquer
thinner. ( gets rid of the finger oil and any magic marker or air tool
oil )
4. Shoot primer.
I use a forced air breathing system more to cool me off in the
Texas heat than for the fresh air ( although that's a nice perk ).
This
looks a little excessive but keeping cool lets me take my time.
Quality
improves dramatically when your not in a hurry.
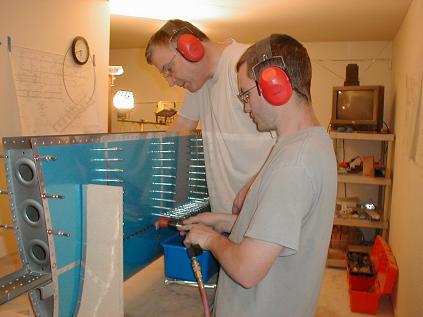
C-Frame Riveting
Not just a dimpler but a riveter as well. You will make liberal use of this while assembly of the front and rear spars.

Horizontal Stabilizer
Center Rib
Clearly the center rib ( one on each side ) of the Horizontal
stabilizer is the hardest part of the tail kit. I found it to be
a challenge but not insurmountable. In order to get the ribs to
fit you have to flute the heck out of them. Not just around the
sides but also right on the tip. You have to reduce the tip width
to be able to fit
them in that very narrow area that makes up the interior of the leading
edge.
This just in... I had an occasion to have
a look at the latest version of the ribs now being provided by Van's (
must be a new batch ). The new nose ribs are NARROWER than the
ones that came in my kit purchased this year. The NEW ribs have a
nose width of
1 inch vs the ones that I received in my kit which were at least 1-1/4
to
1-1/2 inches across the nose. The newer ribs fit MUCH better than
the
old ones and don't require additional fluting in the nose area.
You may still find that it's necessary to file the nose of the
rib down so it will not dig into the skin but should not have to reduce
it's width.

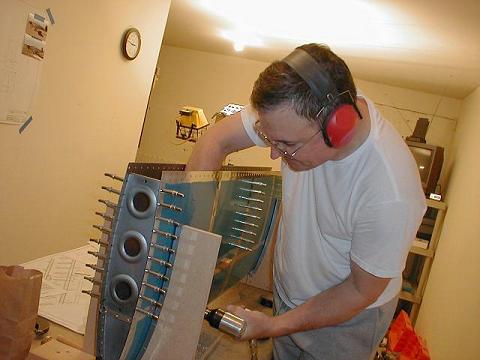
When you match drill these center ribs to the skin you will
notice ( if you sight down the length ) when you have the entire
assembly clecoed together that there are some obvious bulges around the
number 2 and 3 holes ( counting from the tip ) of the rib.
After drilling, dimpling and priming do the following:
Go ahead and make some shims to slide in to these gaps from the
spar material that is supplied with the empennage kit. the number
2 hole requires a .025 shim and the number 3 hole requires a .020 shim.
Next take both of your wooden forms and slide them on either
side of your center rivet line ( about 6 or 8 inches apart ).
Make sure you have someone on the gun while your inside bucking
( this is very difficult for just one person ).
I used the following two bucking bars.

Be sure and wrap them in foam or some other vibration dampening
material ( cloth, whatever you have handy ) and attach this with duct
tape.
Use a ton of rivet tape ( this will keep all the nasty black
marks off of your work for this one crucial area.

Rivet away.
Tada!

My son Mark helps with the crucial nose rib rivets. You
need all the help you can get with these.
Gotta love the new construction methods in the 9A.
Truly a do it yourself airplane. Me bucking my own in my
underground shop. You can't believe how much better this
is than the 8 tail I built. Just for fun I replaced the pops
called out with some cherry max rivets. Same as solid if you
believe the marketing literature. Spruce sells them for 32 cents
a pop.
(This web site is provided
for entertainment purposes. As with all aircraft kits, the kit
manufacture is the final authority on all construction issues.)